Table of Contents
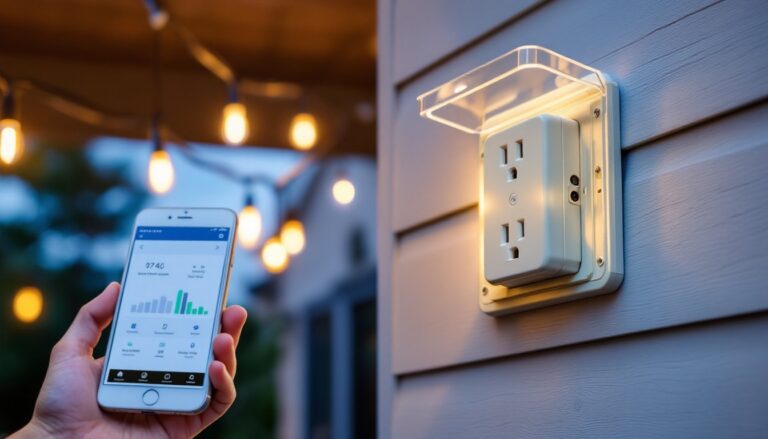
ToggleSmart outdoor outlets put control of exterior power in the palm of your hand, literally. These weatherproof receptacles let homeowners schedule holiday lights, control fountains and pumps, monitor energy use, and cut power remotely through smartphone apps or voice commands. They’re built to withstand rain, snow, UV exposure, and temperature swings while integrating seamlessly with home automation ecosystems. Whether you’re upgrading a single receptacle or planning a whole-yard smart power system, understanding the tech, features, and installation process ensures you choose the right outlet and install it safely.
Key Takeaways
- Smart outdoor outlets enable remote scheduling, voice control, and real-time energy monitoring for exterior power through smartphone apps and voice assistants like Alexa and Google Assistant.
- Choose outlets with individual receptacle control, IP65+ weather ratings, UL 943 GFCI certification, and compatibility with your home automation ecosystem to ensure reliability and safety.
- Mid-range smart outdoor outlet models ($60–90) offer the best value for pool equipment and hot tubs with energy monitoring, while budget options ($35–50) work well for holiday lighting.
- Proper installation requires turning off power at the breaker, testing GFCI function, securely connecting black (hot), white (neutral), and ground wires, and verifying weatherproof seal integrity.
- Connectivity options include Wi-Fi for direct router connection, or Zigbee/Z-Wave mesh networks for better range and local operation during internet outages on larger properties.
What Is a Smart Outdoor Outlet and How Does It Work?
A smart outdoor outlet is a weather-resistant electrical receptacle with built-in Wi-Fi, Bluetooth, or Zigbee connectivity that allows remote control and automation. Unlike standard GFCI outlets, these units include a communication module and relay switches that respond to app commands, voice assistants (Alexa, Google Assistant, Siri), or programmed schedules.
Most models replace existing outdoor outlets in a standard single-gang electrical box. They connect to home Wi-Fi during setup, then communicate with cloud servers or local hubs. When a user sends a command, say, “Alexa, turn off the patio lights”, the signal travels through the network to the outlet’s relay, which opens or closes the circuit to individual receptacles.
Dual-outlet models often allow independent control of each receptacle, so the top plug can run on a schedule (fountain pump, 6 a.m. to 9 p.m.) while the bottom stays always-on for essential devices. Some units monitor real-time energy consumption in watts or kilowatt-hours, helping homeowners spot phantom loads or confirm devices are actually running.
Key components include a GFCI module for shock protection, weatherproof gaskets and covers rated IP65 or higher, tamper-resistant shutters meeting NEC 406.12 requirements, and onboard firmware that receives over-the-air updates. Connectivity ranges from basic Wi-Fi (2.4 GHz only, in most cases) to Zigbee or Z-Wave for integration with advanced home automation hubs like SmartThings or Home Assistant.
Key Benefits of Installing Smart Outdoor Outlets
Scheduling and automation top the list. Homeowners set timers for landscape lighting, pool pumps, or seasonal decorations without installing separate mechanical timers or remembering to flip breakers. Sunrise/sunset triggers adjust automatically as daylight hours shift, eliminating twice-yearly reprogramming.
Remote control provides peace of mind. Forgot to turn off the inflatable lawn ornament before leaving for vacation? Kill power from the airport. Need to restart a malfunctioning smart sprinkler controller? Toggle the outlet off and on from the couch.
Energy monitoring reveals phantom draw and runtime costs. A hot tub heater drawing 1,500 watts for 8 hours daily costs roughly $36 per month at $0.10/kWh, information that prompts smarter usage or equipment upgrades.
Voice control simplifies operation. Hands full of groceries? Tell your assistant to turn on the garage work lights. Hosting a backyard party? Command the string lights and speakers on simultaneously through a single routine.
Safety improvements include automatic shutoff if a device exceeds a set wattage threshold (indicating a short or overload) and the ability to disable outlets when kids are playing near power tools or water features. GFCI protection remains active even when the smart features lose connectivity, so core electrical safety never depends on Wi-Fi.
Top Features to Look for When Choosing a Smart Outdoor Outlet
Individual receptacle control matters for flexibility. If both plugs share a single relay, you can’t run the fountain 24/7 while scheduling the lights, everything turns on or off together. Models with dual independent outlets cost $10–20 more but eliminate the need for multiple smart plugs or timers.
Energy monitoring accuracy varies. Basic models report on/off status only: mid-tier units show real-time wattage: premium versions log historical usage by day, week, or month and calculate cost based on user-entered electricity rates. For pool pumps, hot tubs, or grow lights, this data justifies the investment.
Voice assistant compatibility should match your existing ecosystem. Most outlets support Alexa and Google Assistant: fewer work natively with Apple HomeKit, often requiring a separate hub. Check whether voice control needs cloud access or can run locally during internet outages.
Connectivity protocol affects reliability and range. Wi-Fi outlets connect directly to routers but may struggle at the far end of a yard or behind brick walls. Zigbee and Z-Wave models communicate through mesh networks, hopping signals between devices for better coverage, but require a compatible hub (SmartThings, Hubitat, Home Assistant with a USB dongle).
Mounting options include direct replacement for single-gang boxes, while-in-use covers that allow plugs to stay inserted with the lid closed, and models with built-in photocells or motion sensors. While-in-use covers add about 2 inches of depth: confirm your electrical box has adequate room or consider a box extender.
Weather Resistance and Safety Certifications
IP ratings quantify protection against dust and water. IP65 (dust-tight, protected against water jets) is the baseline for true outdoor use: IP66 or IP67 offer higher resistance to pressure washing or temporary submersion. Outlets labeled “water-resistant” without an IP rating may fail in heavy rain or snow.
UL 943 certification ensures GFCI functionality meets U.S. safety standards for ground-fault protection (tripping within 0.025 seconds at 5 mA current differential). UL 498 covers receptacle construction and materials. Both certifications should appear on the device label or packaging.
NEC compliance includes tamper-resistant shutters (required for all new outdoor receptacles per NEC 406.12), proper wire gauge support (usually 14 AWG or 12 AWG copper), and GFCI protection. Smart outlets with integrated GFCI eliminate the need for upstream GFCI breakers or outlets, simplifying retrofits.
Operating temperature range matters in extreme climates. Most units tolerate -4°F to 122°F (-20°C to 50°C), but verify specs if you’re installing in desert heat or northern winters. Extreme cold can slow Wi-Fi response times: extreme heat degrades relay lifespan.
Warranty length reflects manufacturer confidence. Look for at least a two-year warranty covering defects and weather damage. Some premium brands offer five-year coverage, which matters when the outlet is hardwired into your home’s electrical system.
Best Smart Outdoor Outlets for Different Use Cases
For budget-conscious installations, basic Wi-Fi outlets with dual independent control and GFCI protection start around $35–50. These handle holiday lights, landscape lighting, and small pumps (up to 15 amps total, 1,800 watts at 120V) with app scheduling and voice control but skip energy monitoring. Expect manual firmware updates and occasional Wi-Fi dropouts if your router sits far from the outlet.
Mid-range models ($60–90) add energy monitoring, sunrise/sunset scheduling, and while-in-use covers. Some include photocell sensors that automatically switch on at dusk, with manual override via app. These suit pool equipment, hot tubs, and outdoor entertainment systems where energy tracking justifies the cost. Independent testing by experts in smart home devices consistently highlights the value of energy monitoring for high-draw appliances.
Premium Zigbee/Z-Wave outlets ($80–120) integrate with advanced home automation hubs, enabling complex automations (“If motion detected on driveway camera, turn on front pathway lights for 10 minutes”). Mesh networking extends range across large properties. These work locally even if internet or cloud services fail, a critical feature for security lighting or sump pumps. They’re the top choice for tech-savvy DIYers building whole-home automation systems.
Commercial-grade units ($150+) offer 20-amp capacity, metal enclosures, and IP67 ratings suitable for car chargers, power tools, or equipment subject to pressure washing. Some include built-in timers with battery backup, LCD screens, and lockout features preventing unauthorized use. Overkill for string lights: essential for job sites or heavy equipment.
Matching outlet features to actual use prevents overspending and underperformance. Holiday lights need basic scheduling: a pool pump benefits from energy monitoring: a hot tub installer might require 20-amp capacity and professional-grade weatherproofing.
How to Install a Smart Outdoor Outlet (Step-by-Step)
Safety first: Shut off power at the breaker, not just the outlet switch. Use a non-contact voltage tester to confirm no current at the outlet box. Outdoor outlets sit on 15-amp or 20-amp circuits: verify your smart outlet matches circuit capacity (check breaker label and wire gauge, 14 AWG for 15-amp, 12 AWG for 20-amp).
Note on permits and codes: Replacing an existing outdoor outlet with a like-for-like smart model typically does not require a permit in most jurisdictions, since you’re not altering the circuit or adding load. But, if you’re installing a new outdoor outlet, running new wire, or upgrading from 15-amp to 20-amp service, a permit and inspection are usually required under the National Electrical Code (NEC) and local amendments. When in doubt, check with your local building department. If you’re uncomfortable working with live electrical boxes or your home has aluminum wiring, hire a licensed electrician.
-
Remove the old outlet. Unscrew the cover plate and outlet mounting screws. Pull the outlet gently from the box. Note wire connections: black (hot), white (neutral), green or bare copper (ground). If GFCI, there will be LINE and LOAD terminals, LINE connects to the breaker, LOAD feeds downstream outlets. Take a photo before disconnecting.
-
Prepare the smart outlet. Most units have screw terminals or push-in connectors. If your box has LOAD wires (feeding additional outdoor outlets downstream), connect them to the smart outlet’s LOAD terminals to maintain GFCI protection for the whole chain. If there are no LOAD wires, connect only the LINE wires and cap or remove LOAD terminals per manufacturer instructions.
-
Connect wires. Attach black (hot) to brass or black terminal, white (neutral) to silver or white terminal, and ground to green screw. Push-in connectors require stripping 5/8 inch of insulation: screw terminals need 3/4 inch, formed into a clockwise hook. Tug each wire firmly, if it pulls free, redo the connection.
-
Test GFCI function. Restore breaker power. Press the outlet’s TEST button: it should click and cut power. Press RESET to restore. If it doesn’t trip, wiring is incorrect or the unit is defective, do not proceed.
-
Install the outlet and cover. Fold wires carefully into the box (outdoor boxes are often shallow: avoid pinching). Screw the outlet to the box, ensuring it sits flush and level. Attach the weatherproof while-in-use cover or flat cover with gasket, tightening screws evenly to compress the gasket seal.
-
Set up connectivity. Download the manufacturer’s app, create an account, and follow pairing instructions (usually holding a button on the outlet for 5–10 seconds until an LED blinks). Connect to your home Wi-Fi (2.4 GHz band in most cases: 5 GHz won’t work). Name each receptacle clearly (“Front Porch Lights,” “Fountain Pump”) and assign to rooms or routines.
-
Test operation and weatherproofing. Toggle each outlet on and off via app and voice command. Check that schedules trigger correctly. Spray the cover gently with a hose (not a pressure washer) to verify the gasket seals properly. If water enters the box, turn off the breaker, dry thoroughly, and reseat the gasket or add silicone caulk around the box edges.
Common pitfall: Forgetting to connect the ground wire. Outdoor outlets face moisture and physical contact: a proper ground path prevents shock if the device case becomes energized. The green or bare copper wire is not optional.
Conclusion
Smart outdoor outlets deliver control, efficiency, and convenience once reserved for high-end home automation systems, now at prices and complexity levels accessible to any DIYer comfortable with basic electrical work. Prioritize weather ratings, independent receptacle control, and compatibility with your existing smart home ecosystem. Installation is straightforward for anyone who’s swapped a standard outlet, but always respect electrical safety protocols and local codes. With the right outlet in place, outdoor power becomes as flexible and intelligent as the rest of the connected home.