Table of Contents
ToggleAn outdoor kitchen without a sink is like a workshop without a workbench, technically functional, but far from efficient. Adding a sink transforms an outdoor grill station into a genuine prep-and-cook space where hosts can wash vegetables, rinse utensils, and clean up without tracking dirt through the house. Whether planning a full outdoor kitchen buildout or upgrading an existing setup, understanding sink types, plumbing requirements, and material choices helps homeowners avoid costly mistakes. This guide covers the practical considerations for integrating a sink into an outdoor kitchen, from supply lines to installation complexity.
Key Takeaways
- An outdoor kitchen with sink eliminates back-and-forth trips between indoor and outdoor spaces, improving food safety by preventing cross-contamination and reducing cleanup time significantly.
- Drop-in sinks are DIY-friendly, while undermount sinks offer a seamless look but require professional installation on natural stone—stainless steel (18-gauge type 304 or 316) is the most durable choice for outdoor use.
- Extending your home’s existing water and drainage lines underground is the most reliable approach, though hose bibb adapters provide a budget alternative for seasonal outdoor kitchens without permanent plumbing.
- Position the outdoor kitchen sink within the work triangle (4–9 feet from the grill and cooler), upwind of the grill when possible, with at least 18 inches of counter space on either side for efficient meal prep.
- Hot water installation requires either extending indoor lines or adding a tankless water heater, which adds expense and complexity—many outdoor kitchens function well with cold water only.
- Hire a licensed plumber for trenching beyond 20 feet, permitted work, hot water systems, or connections to septic lines; DIYers can handle drop-in sinks with nearby water supplies and proper winterization in cold climates.
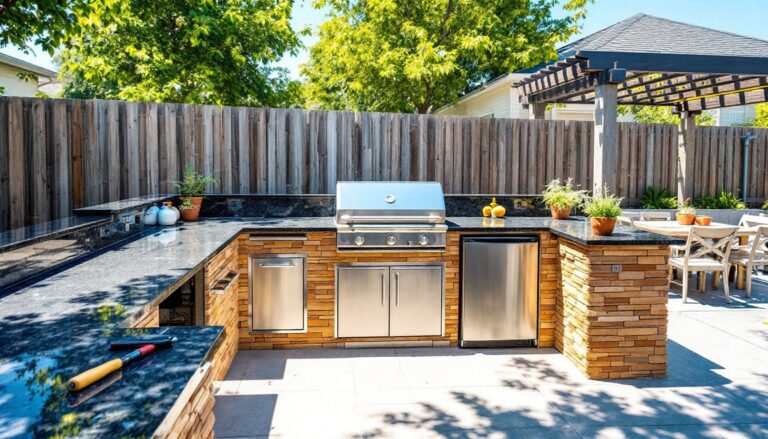
Why Add a Sink to Your Outdoor Kitchen?
A sink eliminates the constant back-and-forth that breaks up meal prep and slows down entertaining. Rinsing produce, filling pots, washing hands, and disposing of food scraps all happen at the cooking station instead of inside.
Beyond convenience, a sink keeps raw meat cross-contamination outside. After handling chicken or burgers at the grill, a quick wash prevents tracking bacteria indoors. It’s a practical food safety upgrade, especially during summer cookouts.
Sinks also increase property value when they’re part of a well-designed outdoor living area. Buyers looking at homes with outdoor living upgrades often view a sink as a must-have feature, not a luxury add-on.
Finally, cleanup becomes faster. Scraping plates, soaking grill grates, and washing serving platters on-site means less work inside later. For frequent entertainers, that time savings compounds quickly.
Types of Outdoor Kitchen Sinks
Drop-In Sinks
Drop-in sinks rest on top of the counter with a visible rim. They’re the easiest to install, requiring only a cutout in the countertop and a bead of silicone caulk to seal the rim. Most DIYers with basic tools can handle this installation.
The rim catches water and debris, which can make cleaning around the edge tedious. Over time, caulk can degrade from UV exposure, requiring occasional resealing.
Undermount Sinks
Undermount sinks attach beneath the counter, creating a seamless look with no rim or lip. They’re easier to wipe down, crumbs and water sweep directly into the basin.
Installation requires more skill. The sink mounts to the underside of the countertop using epoxy and brackets, and the cutout edge must be polished and sealed (especially critical with natural stone). Concrete, granite, and quartz counters work well: tile edges need careful waterproofing.
Prep Sinks vs. Full-Size Basins
Prep sinks (typically 15–18 inches wide) handle vegetable rinsing and hand-washing. They take up less counter space and require less plumbing capacity, but they’re too small for washing large pots or baking sheets.
Full-size sinks (20–33 inches) accommodate stockpots, cutting boards, and full dinner service cleanup. They’re more versatile but demand more counter real estate and a higher flow rate from the water supply.
For serious outdoor cooks, a full-size basin makes sense. Casual grillers can get by with a compact prep sink.
Plumbing and Water Supply Options
Tapping Into Existing Lines
The most reliable approach is extending the home’s existing water supply and drainage. This requires running 3/4-inch PEX or copper supply lines underground from the house to the outdoor kitchen location, typically buried 12–18 inches deep (below the frost line in cold climates).
Drainage needs a dedicated waste line, usually 1.5-inch PVC, sloped at 1/4 inch per foot toward the main sewer or septic system. This often requires trenching, which adds labor cost and complexity.
Most jurisdictions require a permit for this type of plumbing work. Hire a licensed plumber if local codes mandate it, or if the distance from the house exceeds 50 feet. Improper drainage slopes or cross-connections can fail inspections and cause recurring clogs.
Hose Bibb Adapters
For budget-conscious DIYers, a quick-connect hose adapter offers cold water without permanent plumbing. These screw onto an existing outdoor spigot and run a garden hose to the sink faucet.
Downsides: water pressure may drop if other hoses are in use, and the setup usually provides cold water only. Drainage still requires a proper waste line or gray water disposal method (legal in some areas for vegetable rinse water, but check local codes).
This solution works for seasonal setups or temporary outdoor kitchens. It’s not ideal for year-round use or locations far from an exterior faucet.
Hot Water Options
Installing hot water outdoors requires either extending the home’s hot water line (expensive and heat-loss prone over long distances) or adding a tankless electric or propane water heater near the sink.
Tankless units (like those from Rheem or Rinnai) mount under the counter or nearby and heat water on demand. Electric models need a dedicated 240V circuit, which requires an electrician. Propane versions need a gas line and proper venting.
Many outdoor kitchens skip hot water entirely. Cold water handles most rinsing and cleanup tasks, and it’s one less system to winterize in freezing climates.
Choosing the Right Materials for Durability
Stainless Steel
Stainless steel (preferably 18-gauge or heavier, type 304 or 316) dominates outdoor kitchens for good reason. It resists rust, handles temperature swings, and cleans easily.
Type 316 stainless (marine-grade) offers better corrosion resistance in coastal areas where salt spray accelerates rust. Type 304 works fine for inland locations.
Cheaper, thinner-gauge steel (20-gauge or higher number) dents more easily and may warp under thermal stress. Stick with 18-gauge or lower for sinks that will see daily use.
Cast Iron and Enamel
Enameled cast iron sinks look handsome and muffle water noise, but the enamel can chip if struck by heavy pots or metal utensils. Once chipped, the exposed iron rusts.
They’re better suited to covered or screened outdoor kitchens where they’re protected from the elements. Full sun and freeze-thaw cycles accelerate enamel degradation.
Composite and Natural Stone
Granite composite sinks (a mix of crushed granite and resin) resist scratches and heat, but UV exposure can fade darker colors over time. Lighter shades hold up better outdoors.
Natural stone basins (carved from granite or soapstone) make a statement but weigh a ton, literally. They require robust structural support and regular sealing to prevent staining. These are high-maintenance choices best left to homeowners with covered outdoor kitchens and a taste for unique aesthetics.
For most DIY projects, stainless steel offers the best balance of cost, durability, and low maintenance.
Design and Layout Considerations
Work Triangle and Sink Placement
Borrow the classic kitchen work triangle: position the sink, grill, and refrigerator or cooler within 4–9 feet of each other. This minimizes steps during meal prep.
Place the sink upwind of the grill when possible, so smoke doesn’t blow into someone’s face while they’re washing vegetables. If the dominant wind direction varies, consider a sink location that’s slightly offset rather than directly downwind.
Counter Space Around the Sink
Leave at least 18 inches of counter on one side of the sink for stacking dirty dishes or setting down rinsed items. On the prep side, 24–36 inches provides room for cutting boards and ingredient bowls.
Tight layouts often sacrifice this landing space, which leads to clutter and inefficiency. If the outdoor kitchen footprint is limited, a smaller sink may be a better choice than cramming a large basin into inadequate counter space.
Drainage and Slope
Even covered outdoor kitchens collect rain and hose spray. Design the counter with a slight slope (1/8 inch per foot) away from the sink toward a drip edge or drainage channel. This prevents standing water, which stains stone and corrodes metal over time.
For exposed outdoor living designs, consider how the sink integrates with the broader landscape drainage plan. Runoff should flow toward appropriate drainage, not pool against the home’s foundation.
Installation: DIY vs. Professional Help
What a DIYer Can Handle
Homeowners with basic plumbing and carpentry skills can install a drop-in sink with an existing water supply nearby. The process involves:
- Cutting the countertop opening using a jigsaw (follow the sink template exactly).
- Applying a bead of silicone caulk around the cutout edge.
- Dropping the sink into place and securing clips underneath.
- Connecting the faucet and drain lines with standard PEX or flexible supply lines and a P-trap.
Safety note: Wear safety goggles when cutting countertops (stone or concrete dust is hazardous) and work gloves when handling cut edges.
A hose bibb adapter or nearby outdoor spigot simplifies water supply. For drainage, a DIYer can run a PVC waste line to an existing cleanout or graywater system if local codes allow it.
When to Call a Pro
Hire a licensed plumber if:
- The water supply line requires trenching more than 20 feet or crossing under hardscape like patios or driveways.
- Local codes require a permit and inspection for the plumbing work.
- The project includes hot water or a tankless heater requiring gas lines or 240V electrical.
- The drainage connection ties into the main sewer or septic system (improper venting or slope can cause backups).
Undermount sink installations on natural stone counters also benefit from professional help. The cutout edge must be polished and sealed correctly, or moisture will wick into the stone and cause cracking or staining.
Winterization in Cold Climates
Outdoor plumbing in freezing climates needs winterization. This involves:
- Shutting off the outdoor water supply at an interior shut-off valve.
- Draining all lines using a drain-down valve or compressed air.
- Removing and storing the faucet if it’s not freeze-proof.
Skip this step, and frozen pipes will burst, causing expensive damage. Many homeowners hire a plumber for annual winterization and spring startup rather than risk DIY mistakes.
Conclusion
A well-planned outdoor kitchen sink turns a grilling area into a functional workspace that rivals an indoor kitchen. Choosing the right sink type, understanding plumbing requirements, and selecting durable materials ensures the investment pays off in convenience and property value. DIYers can handle straightforward installations, but don’t hesitate to bring in a licensed plumber when codes, distance, or complexity demand it. With proper planning, an outdoor sink becomes the hub of efficient, enjoyable outdoor cooking.