Table of Contents
ToggleBuilding an outdoor kitchen pavilion transforms a backyard from a simple patio into a fully functional entertaining hub. It’s the difference between flipping burgers on a portable grill and having a dedicated space with shelter, countertops, and appliances that can handle everything from weeknight dinners to holiday gatherings. A pavilion keeps the weather off your back while cooking and extends your outdoor season by months. Whether you’re planning a full DIY build or working with a contractor, understanding the key decisions, layout, materials, permits, and utilities, will save time, money, and headaches down the line.
Key Takeaways
- An outdoor kitchen pavilion with a solid roof provides year-round weather protection and extends your entertaining season, transforming a backyard into a functional hub for cooking and gatherings.
- Proper planning is essential: choose a size of at least 10 x 12 feet for a basic setup, position it downwind from your home to avoid smoke, and verify all local setback and permit requirements before construction begins.
- Select durable materials like 304-grade stainless steel appliances, outdoor-rated fridges, marine-grade cabinet finishes, and weather-resistant roofing (metal or asphalt) to ensure your pavilion withstands long-term exposure to the elements.
- Utilities such as gas lines, electrical service, and plumbing typically require licensed professionals and inspections, so hire specialized contractors for these tasks even if tackling DIY framing and finishes yourself.
- Budget flexibility on an outdoor kitchen pavilion ranges from $15,000 to $50,000+ depending on size and finishes, but DIY work on framing, finishing, or tile installation can reduce costs by 30–40%.
What Is an Outdoor Kitchen Pavilion and Why You Need One
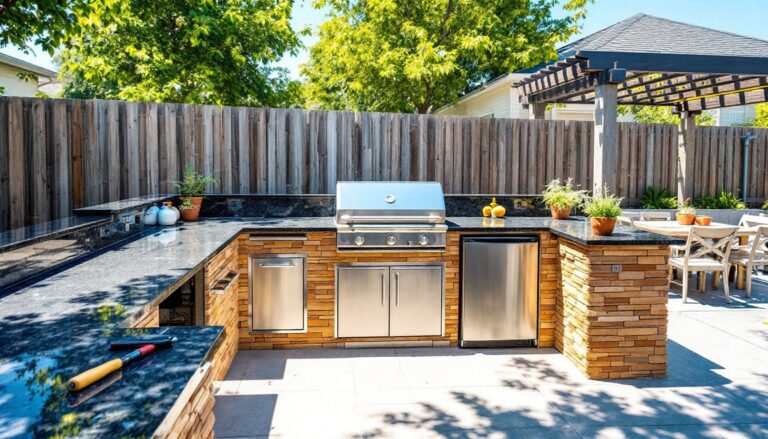
An outdoor kitchen pavilion is a covered structure that houses cooking and prep areas outside the home. Unlike a simple pergola, which provides partial shade, a pavilion has a solid roof, typically metal, shingles, or polycarbonate panels, offering full weather protection. The structure can be freestanding or attached to the house, and often includes built-in counters, a grill, sink, storage, and sometimes seating.
The main advantage is year-round usability. Rain, intense sun, and even light snow won’t shut down your cooking plans. It also keeps smoke and heat outside, which matters during summer when running the indoor oven feels like punishment. For homes with limited indoor kitchen space, a pavilion acts as overflow capacity during parties or meal prep.
From a property value perspective, outdoor kitchens, especially covered ones, are a strong selling point. Buyers in warmer climates or homes with large lots view them as functional square footage, not just decoration. But keep in mind: adding gas lines, electrical service, and plumbing often requires permits and professional installation. Check with your local building department before breaking ground. Many jurisdictions treat pavilions over a certain size (often 120 square feet) as permanent structures requiring setback compliance and inspections.
Planning Your Outdoor Kitchen Pavilion Layout
Choosing the Right Size and Location
Size depends on how you’ll use the space. A basic setup with a grill, small fridge, and counter needs at least 10 x 12 feet. If you’re adding a sink, pizza oven, bar seating, or a dining table under the same roof, plan for 12 x 16 feet or larger. Remember that nominal lumber sizes (a 2×6 is actually 1.5 x 5.5 inches) affect framing dimensions, so account for actual measurements when sketching your layout.
Location matters as much as size. Place the pavilion downwind from the main house to prevent smoke from drifting into windows. Proximity to existing utilities, gas, water, electric, reduces installation costs significantly. Running a new gas line 50 feet from the meter gets expensive fast. Also consider sun exposure: a west-facing pavilion catches afternoon heat, which can be brutal in summer. East or north orientations stay cooler.
Check local setback requirements before pouring footings. Most codes require structures to sit at least 5 to 10 feet from property lines, and attached pavilions may need to meet the same fire-rated wall standards as home additions. If your lot slopes, you may need to level the pad with gravel and compacted fill, or build a raised deck platform. Either way, proper drainage is non-negotiable, standing water under a pavilion leads to mold, rot, and mosquito breeding grounds.
Essential Features and Appliances to Include
Start with the cooking zone. A built-in grill is the centerpiece: look for stainless steel units rated for outdoor use (304-grade stainless resists corrosion better than 430-grade). If you’re serious about pizza or bread, a wood-fired oven adds functionality but requires a reinforced countertop, those ovens weigh 500+ pounds. Plan the counter layout so you have at least 24 inches of prep space on either side of the grill.
A sink makes cleanup infinitely easier. It needs a water supply line (PEX or copper, buried below frost line) and drainage. You can run a drain to the sewer line, a greywater system, or a dry well, depending on local codes. Install a shutoff valve and blow-out drain so you can winterize the plumbing in cold climates.
Refrigeration keeps drinks cold and ingredients fresh. Outdoor-rated fridges are built to handle temperature swings and humidity: indoor fridges will fail quickly outside. Under-counter models (24-inch wide) fit neatly into standard base cabinets. Add storage cabinets with marine-grade or powder-coated finishes, regular painted wood warps and peels.
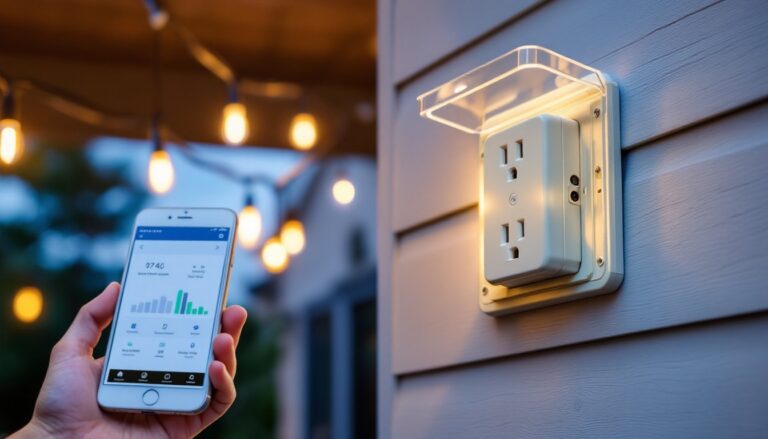
Electrical outlets are essential. You’ll need GFCI-protected outlets for blenders, chargers, and small appliances, plus dedicated circuits for the fridge and any built-in equipment. If you plan to cook after dark, install overhead lighting on a dimmer. Pendant lights or recessed LED cans work well. Task lighting under upper cabinets or along counters improves safety when chopping or grilling. For enhanced ambiance during evening gatherings, many homeowners also add outdoor heaters to extend usability into cooler months.
Materials and Design Options for Your Pavilion
Framing typically uses pressure-treated lumber (for posts and beams in contact with concrete), with standard dimensional lumber (2×6 or 2×8 rafters) for the roof structure. Cedar and redwood offer natural rot resistance and a cleaner look, but cost significantly more. For a modern aesthetic, steel or aluminum frames work well and require less maintenance, though they need welding or specialized brackets.
Roofing choices affect both function and style. Asphalt shingles match most homes and cost around $90–$150 per square (100 sq ft) installed. Metal roofing (standing seam or corrugated) lasts 40+ years, sheds snow and leaves easily, and comes in various colors: expect $400–$700 per square installed. Polycarbonate panels offer a contemporary look and let in diffused light, but they can yellow over time and may not meet fire codes in all areas.
For countertops, tile and concrete are DIY-friendly and affordable. Concrete can be poured in place or precast, and it handles heat well, set hot pans directly on it. Granite and quartz look sharp but need professional fabrication and sealing (granite especially). Avoid laminate: it delaminates in weather. Stainless steel counters are commercial-grade tough, easy to clean, and pair well with modern designs.
Flooring must handle moisture and freeze-thaw cycles. Poured concrete is the workhorse, add a broom finish for traction. Pavers (concrete or natural stone) offer design flexibility and good drainage if laid on a gravel base with polymeric sand. Porcelain tile rated for outdoor use works on a concrete slab, but grout lines need annual sealing. Skip wood decking directly under a grill, grease stains are permanent and a fire risk.
Design platforms like Houzz feature thousands of pavilion layouts and material combinations, helping visualize how stone veneer, board-and-batten siding, or open-rafter ceilings might look in your space. If your goal is a covered outdoor living space that integrates cooking with lounging or dining, consider how the pavilion roof ties into adjacent pergolas, fire pit areas, or pool decks.
Building Your Outdoor Kitchen Pavilion: DIY vs. Professional Installation
A confident DIYer with framing and concrete experience can tackle a basic pavilion. You’ll need a circular saw or miter saw (miter saw gives cleaner angle cuts for rafters), a drill/driver, a level (4-foot and torpedo), speed square, and post-hole digger or auger. Rent a concrete mixer if pouring footings for multiple posts. Plan on two weekends for framing and roofing, plus additional time for utilities and finishes.
Footings must extend below frost line, check local building codes, but expect 36–48 inches deep in northern climates. Use Sonotube forms and pour footings with rebar for strength. Anchor posts with galvanized or stainless post bases to keep wood off direct ground contact. If attaching the pavilion to the house, install a ledger board with lag screws into wall studs or use through-bolts if going into masonry. Flashing above the ledger prevents water intrusion.
Roof framing follows standard carpentry: ridge beam, rafters at 16 or 24 inches on center, and a fascia board to close the ends. Add hurricane ties or rafter hangers for wind resistance. Sheathing (1/2-inch OSB or plywood) goes on before roofing. Always wear safety goggles and gloves when cutting: use hearing protection if running a circular saw or impact driver for extended periods.
Utilities are where most DIYers hit a wall. Running a new gas line, installing a 240V circuit for a built-in grill, or tapping into the main water supply often requires licensed tradespeople and inspections. The National Electrical Code (NEC) mandates GFCI protection for outdoor outlets and specific burial depths for underground wiring (typically 12 inches minimum in conduit for 120V). Gas work must be pressure-tested and inspected. Plumbing codes vary, but most require backflow preventers on outdoor water lines.
If your project includes any of these, or if the pavilion exceeds your local size threshold for permit-free construction, hire professionals for at least the utility rough-in and any structural work. General contractors experienced in outdoor home living projects can coordinate trades, pull permits, and ensure code compliance. Costs vary widely by region and material quality: a turnkey pavilion with full kitchen runs $15,000–$50,000+, depending on size, finishes, and appliances. DIY framing and doing your own tile or concrete work can cut that by 30–40%.
Even if you hire out the build, doing your own finish work, cabinet installation, backsplash tile, or staining wood, saves money and gives you control over details. Just make sure any structural or utility work passes inspection before closing up walls or pouring slabs. Reworking buried electrical conduit or a failed footing is exponentially more expensive than doing it right the first time.
For ideas on how to set up the space once it’s built, many design resources showcase creative outdoor party setups that maximize both function and style. Landscape-focused platforms like Gardenista also offer inspiration for integrating plantings, pathways, and lighting around the pavilion. Regional guides from Sunset can help tailor your design to local climate and entertaining culture.
Conclusion
An outdoor kitchen pavilion is more than a backyard upgrade, it’s a functional investment that changes how a home is used and enjoyed. Whether building from scratch or hiring a crew, focusing on smart layout, durable materials, and code-compliant utilities ensures the structure performs for decades. Plan thoroughly, budget for the hidden costs, and don’t skip the permits.