Table of Contents
ToggleAn outdoor kitchen doesn’t require a contractor, a granite installer, or a second mortgage. With smart material choices, basic carpentry skills, and a weekend or two, anyone can build a functional cooking and prep space for well under $500. This guide walks through planning, sourcing affordable materials, and building a simple but effective outdoor kitchen that handles everything from burger nights to weekend meal prep. No lifestyle fluff, just practical steps to get grilling, prepping, and cooking outside without very costly.
Key Takeaways
- A DIY outdoor kitchen can be built for under $500 with basic carpentry skills, smart material sourcing, and a weekend or two of work.
- Smart material choices like pressure-treated lumber, concrete pavers, and sealed wood countertops keep costs low while maintaining durability and weather resistance.
- Proper planning of layout, location 10–15 feet from your house, and a level surface are essential to ensure your DIY outdoor kitchen is functional, safe, and built to last.
- Start with essentials: a grill, 3–4 feet of counter space, and under-counter storage; upgrades like sinks, pergolas, and mini fridges can be added later as budget allows.
- Budget-friendly cooking solutions like portable propane grills ($80–$150) or charcoal kettles ($50–$100) paired with weatherproof storage bins and quality cutting boards complete a functional outdoor cooking space.
- Regular seasonal maintenance—resealing wood, checking fasteners, and cleaning equipment—ensures your budget outdoor kitchen remains functional and structurally sound for years of regular use.
Why a DIY Outdoor Kitchen Is Worth the Investment
Building an outdoor kitchen extends usable living space, keeps cooking heat and mess outside during warm months, and adds genuine value to a property. Unlike purely cosmetic upgrades, an outdoor cooking area sees regular use, especially for households that grill often or entertain.
From a cost perspective, DIY outdoor kitchens deliver exceptional return compared to contractor-built versions that easily run $5,000–$15,000. A budget build focuses on essentials: a durable prep surface, sheltered storage, and dedicated space for a grill or portable cooktop. Skip the built-in gas lines, pizza ovens, and refrigerators initially, those can be added later if desired.
The build itself requires moderate carpentry skills. If someone can measure accurately, cut lumber square, and drive screws straight, they can handle this project. Most structures use pressure-treated framing and either tile, concrete board, or sealed wood for countertops. No permits are typically required for freestanding structures under a certain square footage (check local codes), though any permanent gas or electrical work does require licensed professionals.
Another advantage: flexibility. A DIY outdoor kitchen can be designed to fit awkward spaces, match existing deck materials, or accommodate a specific portable BBQ setup that’s already owned. Pre-fab outdoor kitchen kits lock users into fixed dimensions and limited configuration options.
Planning Your Budget-Friendly Outdoor Kitchen Layout
Before buying materials, map out the kitchen’s footprint and workflow. Outdoor kitchens function best when they follow the same logic as indoor ones: cooking surface, prep space, and storage arranged in an efficient triangle.
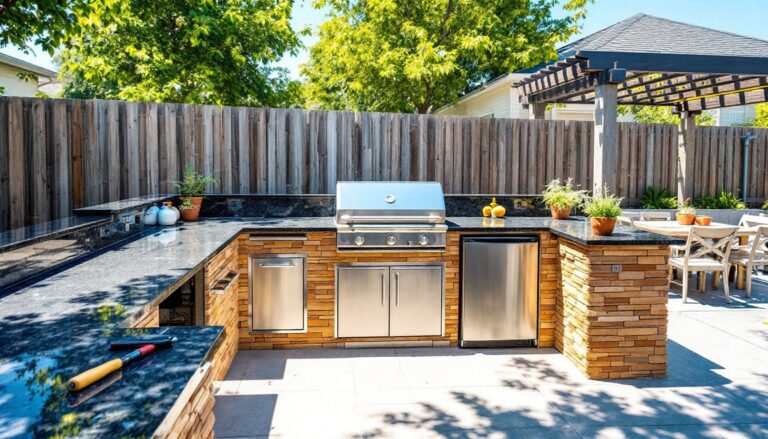
Start by measuring the available area. A minimal functional outdoor kitchen occupies roughly 4 feet by 6 feet, enough room for a small grill, 3–4 feet of counter, and under-counter storage. Larger spaces can accommodate side tables, a separate prep sink (if plumbing is available), or a bar-height eating counter.
Sketch the layout on graph paper or use a free tool like SketchUp. Include the grill’s position (accounting for lid clearance and ventilation), countertop height (36 inches is standard for food prep), and clearance around the cooking area. Leave at least 3 feet of open space in front of the grill for safe movement.
Consider sun and wind exposure. Positioning the kitchen with a windbreak (fence, wall, or plantings) keeps flames steady and reduces propane waste. Afternoon shade improves comfort but isn’t essential. Proximity to the house matters, shorter trips for food, utensils, and cleanup make cooking outside less of a chore.
Don’t forget drainage. If the kitchen will have a sink or produce much water runoff, slight grading away from the structure prevents puddling and wood rot. Ideally, the kitchen sits on a level, stable surface: concrete slab, pavers, or compacted gravel. Soft ground leads to settling and structural issues within a season.
Choosing the Right Location and Size
Location determines how often the kitchen gets used. Place it too far from the house, and it becomes a rarely-used novelty. Too close, and smoke drifts into open windows.
Aim for 10–15 feet from the house, close enough for convenience, far enough to keep grease splatters and smoke away from siding and windows. Check local fire codes: many jurisdictions require grills to sit a minimum distance from structures (often 10 feet for propane, less for charcoal).
Size depends on cooking style and budget. A solo griller needs less space than someone hosting regular cookouts. For tight budgets, start with a 6-foot counter that holds a grill and provides 2–3 feet of prep space. This can be built for $300–$400 in materials. Expansion is straightforward, add modular sections as funds allow.
Avoid placing the kitchen under low tree branches (fire hazard) or in low-lying areas that collect water. If building on a deck, verify that the structure can handle the added weight, grills, countertops, and stored propane tanks add up. Consult the deck’s original plans or have a contractor assess load-bearing capacity if uncertain.
Affordable Materials and Where to Find Them
Smart material sourcing keeps costs under $500. New lumber, hardware, and finishing materials from big-box stores work fine, but hunting for deals cuts the budget significantly.
Pressure-treated lumber forms the frame. For a basic 6-foot outdoor kitchen, expect to need:
- Four 4×4 posts (cut to 36″ for counter height)
- Six 2×4 studs (8-foot lengths, cut to fit)
- One sheet ¾-inch exterior plywood for the counter base
- Deck screws (3-inch for framing, 1½-inch for plywood)
Total framing cost: roughly $80–$120 depending on lumber prices.
For the countertop, several budget options work:
- Concrete pavers or tiles: durable, heat-resistant, and available for $1–$3 per square foot. Set them in thinset mortar over cement board.
- Sealed butcher block: attractive and functional, but requires annual sealing. Costs $4–$6 per square foot.
- Outdoor-rated plywood with marine-grade sealer: cheapest option at $2–$3 per square foot. Needs resealing every 1–2 years.
Many outdoor living projects use recycled or salvaged materials effectively. Check:
- Habitat for Humanity ReStores: salvaged countertops, sinks, and hardware at 50–80% off retail.
- Craigslist and Facebook Marketplace: free or cheap pavers, bricks, reclaimed wood, and surplus tile.
- Construction site dumpsters (with permission): cutoffs, partial plywood sheets, and leftover fasteners.
Stain or paint adds weather protection and visual appeal. Exterior-grade wood stain costs $25–$40 per gallon and covers roughly 200 square feet per coat. Two coats provide adequate UV and moisture protection.
Hardware needs are minimal: heavy-duty shelf brackets ($8–$12 each) support countertop overhangs, and exterior-grade hinges ($5–$10 per pair) work for cabinet doors if adding storage. Avoid interior hardware, it rusts quickly outdoors.
Step-by-Step Build Guide for Your DIY Outdoor Kitchen
Building a basic outdoor kitchen breaks down into five phases: site prep, framing, countertop installation, finishing, and equipment setup. Budget a full weekend for the build, plus drying time for sealers and stains.
Phase 1: Site Prep
- Clear and level the build area. Use a 4-foot level to check in multiple directions.
- Lay down a base: compacted gravel (4 inches deep), concrete pavers, or an existing patio work well.
- Mark the footprint with stakes and string. Double-check measurements, cutting lumber is easy: fixing a crooked frame isn’t.
Phase 2: Build the Frame
- Cut four 4×4 posts to 36 inches (or 30 inches if accounting for a 1.5-inch countertop and wanting a finished height of 36 inches).
- Position posts at the corners of your layout. Use a level to ensure they’re plumb.
- Connect posts with 2×4 horizontal rails at top and bottom (front and back). Secure with 3-inch deck screws, two per joint.
- Add a center support rail if the span exceeds 4 feet. This prevents countertop sag.
- Install cross-bracing (2×4s run diagonally between posts) for stability. Outdoor structures take wind load: bracing prevents racking.
Phase 3: Add the Counter Base
- Cut ¾-inch exterior plywood to fit the frame top.
- Screw plywood to the top rails using 1½-inch deck screws every 8 inches.
- If using tile or pavers for the finished surface, add a layer of ½-inch cement board over the plywood. This provides a stable substrate for thinset mortar.
Safety note: Wear eye protection when cutting lumber and work gloves when handling pressure-treated wood (it contains chemical preservatives).
Creating a Simple Counter and Prep Station
The countertop makes or breaks usability. It needs to handle heat, moisture, knife work, and the occasional spilled marinade.
For a tile or paver top:
- Dry-lay pavers on the cement board to check fit. Cut edge pieces with a wet saw or angle grinder (wear safety goggles and a dust mask).
- Mix thinset mortar per bag instructions. Spread with a notched trowel.
- Set pavers, leaving 1/8-inch gaps for grout (optional, tight-set pavers don’t require grout outdoors).
- Let cure 24 hours, then seal with exterior stone sealer.
For a sealed wood top:
- Sand the plywood smooth (120-grit).
- Apply marine-grade spar varnish or exterior wood sealer, three coats minimum, sanding lightly between coats.
- Allow 48 hours to cure fully before use.
Add an overhang (6–10 inches) on one side for bar seating if space allows. Support overhangs with heavy-duty steel brackets rated for the weight, each bracket should handle at least 200 pounds.
Phase 4: Finishing Touches
Stain or paint the frame. Exterior wood stain penetrates better than paint and requires less maintenance. Apply two coats, letting each dry per label instructions.
Install simple storage: screw shelf brackets to the inside of the frame and add a plywood shelf 12–18 inches below the counter. This holds propane tanks, utensils, and supplies.
Consider adding hooks (heavy-duty S-hooks work well) on the sides for towels, grilling tools, or a small cutting board. Those familiar with outdoor party setups know that accessible tool storage prevents mid-cook trips to the garage.
Budget-Friendly Cooking Solutions and Equipment
The cooking equipment determines how the kitchen functions. For a sub-$500 build, the countertop and storage typically consume $300–$400, leaving $100–$200 for cooking gear.
Grill or Cooktop Options:
- Portable propane grill ($80–$150): versatile, easy to replace, and doesn’t require built-in installation. Two-burner models provide enough cooking area for most meals.
- Single-burner camp stove ($30–$60): fits tight budgets and works for side dishes, sauces, or boiling water. Pair with a grill for full cooking capability.
- Charcoal kettle grill ($50–$100): classic option for those who prefer charcoal flavor. Requires more attention but delivers excellent results.
Avoid cheap, thin-metal grills, they rust quickly and cook unevenly. Stick with brands known for durability, even in entry-level models. Cast-iron grates outlast chrome-plated steel and are worth the small upcharge.
Additional Equipment:
- Cutting board: get a commercial-grade HDPE plastic board ($15–$25) that won’t warp in weather.
- Storage bins: weatherproof plastic bins ($10–$20 each) keep utensils, charcoal, and supplies dry.
- Lighting: battery-powered LED strips or solar path lights ($15–$30) extend usability after dark.
- Fire extinguisher: Class B/C rated, mounted within arm’s reach. Non-negotiable for any outdoor cooking area.
For those exploring fun outdoor living ideas, a simple addition like a wall-mounted bottle opener or a small cooler nook built into the structure increases functionality without adding cost.
Some builders add a small prep sink if a garden hose bib is nearby. A basic stainless sink costs $40–$80, and flexible hose connections allow seasonal use (disconnect and drain before freezing weather). This isn’t essential but dramatically improves convenience. Resources like Southern Living showcase how even modest outdoor spaces benefit from thoughtful additions like sinks or herb planters.
Long-Term Upgrades:
Once the basic structure is complete and proven, consider:
- Adding a pergola or shade cover (see guides on Sunset for Western-friendly designs).
- Installing a mini fridge (used models run $50–$100 on Craigslist).
- Building a built-in grill surround if upgrading to a drop-in grill unit.
- Creating a designated outdoor retreat space that integrates the kitchen with seating and landscaping.
These upgrades build on the original frame and counter, so the initial investment isn’t wasted. Many DIY enthusiasts, as seen on sites like Young House Love, tackle outdoor kitchens in phases, building the bones first, then adding amenities as time and budget allow.
A well-built budget outdoor kitchen handles years of regular use. Seasonal maintenance, resealing wood, checking fasteners, and cleaning the grill, keeps everything functional. The structure itself requires minimal upkeep beyond what any outdoor furniture or deck demands.